
To begin, we will need to produce a template for out helmet. On the internet, just search, "side view of a football helmet."

I found a great view of a chargers' helmet, but I wish to make a cowboy helmet, so I searched for, "cowboy's helmet." Feel free to search for your team's favorite helmet. This picture is intended to give us a general idea for the features of out helmet.

So, like all of our projects. Let's begin by laying a few strips of silver duct tape. They should overlap each other slightly, and the total area should be larger than the entire helmet. After we have our tape laid, print and place the template on the duct tape. Be sure to secure it with scrap tape.

Now, we need to cut the helmet portion of our template with our razor knife. (Be extremely careful! Razor knifes are dealy sharp!) See the picture below for a cutting reference.

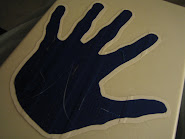
Then. we must cut the face mask portion out. Be sure the face mask is in one piece, or close to it. It will make future steps easier and faster. Be sure to cut the ear hole out but NOT the logo. When you are finished, it should look like the picture below.

Next, we need to place our components on a base. Like the foundation of a house, this will hole the helmet and face mask together. This base should be significantly larger than the helmet. (We will be cutting a small border later, so save room.) When the helmet is placed, the project should look like the picture below.

Then, we will place the face mask. BE CAREFUL. The facemask is relatively thin, and if it is not peeled away from the cutting board carefully, it will stretch and warp. If this happens, it will be extremely hard to fit to the helmet. (This happened to me, so im warning you from experience to save you time.) When the two main components are successfully placed, they should look like the picture below.

Next, we need to craft the blue stripe on top of the helmet. So we must first lay some blue tape. The area must be sufficient to fit the whole stripe. To see how i laid my tape, refer to the picture below.
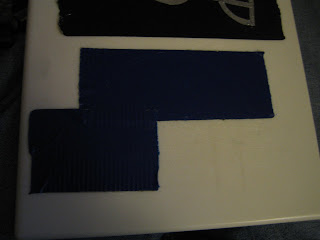
Now, just fasten the remainder of our template over the blue tape and cut a small border. I used a border approximately two millimeters thick. To see how i cut the border, refer to the two pictures below.


Now, we must carefully peel the thin stripe and place it on the edge of our helmet. (so far so good! Now you can see it really start to come together.)

Now we need to craft the infamous cowboy star. This is the most time consuming part of the project. As you can see in the picture below, I referred to the internet to find a suitable template. Just search, "star picture," in a search engine.

To begin our logo, we must first craft a large star, the first and largest of a series of three stars. So, we must lay a small piece of blue duct tape, fasten the template over it, and trace around the star with our razor knife, leaving a millimeter border of while paper. (Cut 1 millimeter outside of the star.)

When it is finished, it should look like the picture below. Also, tape note of my scrap, you will notice i left 1 millimeter of white around the paper star. This will enable us to make a series of smaller stars to effectively create the Cowboy emblem.

Next, we must repeat the process with white tape behind the star. This time, cut along the edges of the star.
 When we are finished, we will have produced a slightly smaller star.
 Now, one last time, we must lay another blue square of tape, fasten the star, then cut 1 millimeter inside the star.
 When this is all finished we must place the stars from largest to smallest on the helmet. Be sure to take time to carefully center the emblem. If it is off, it will appear extremely sloppy. When we are all finished. It should look like the glorious picture below!

Happy Superbowl! Enjoy! Keep on duct taping! Be sure to stay tuned for our exciting, upcoming lessons!


1 comment:
Check out my duct tape Dallas Cowboys Helmet and others at: http://ductart.blogspot.com
Post a Comment