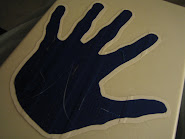
 To initiate our project, we must first trace a regular bi-fold wallet. In the picture below, you will see two lines significantly close to each other. On a wallet, the outside is always slightly longer than the inside to compensate for folding radii. (plural of radius.) So, we must make two sheets of duct tape, but one must slightly exceed the other in length.
We must peel several lengths of tape, and slightly overlap them. The picture below illustrates what the finished product should look like. Be sure the sticky side is facing up because we will be placing another layer on top of it.

Now, we must begin to lay our second layer over the first layer. This will prevent our money from sticking to the sides of our wallet.

When we are finished, we should have a black sheet of duct tape as illustrated in the picture below.

Now, using the measurements we recorded from our template wallet, we will cut out sheets to a precise size. So, we must first fix our sheet of black duct tape to our cutting board using scrap tape, then fix out paper template over it.

We will cut it out. We now have the first major side of our wallet! It should look like the picture below.

Now, repeat this process to create the second major side of the wallet. Be sure to make it slightly larger to compensate for fold discrepancies. The picture below illustrates approximately how far the length variance should be.

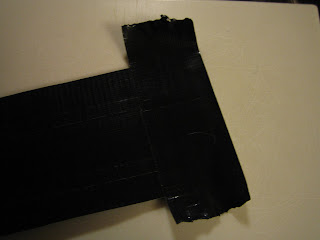
Now we must put our two sheets together. Lay the sheets side by side, (small sides should touch) and place a piece of duct tape over them, like the picture below illustrates.

Now we must flip the wallet over. (The side facing down should now be facing up) We must place another piece of duct tape over the joint. Once we have completed this stage, we will utilize our razor knife (Very sharp, please be careful!) to trim the excess duct tape. When this is finished, the joint should look like the picture below. If it does not, don't worry! Discrepancies here are not fatal.

Now we must adhere our second joint. Unlike our first joint, this mandates a different procedure. We will take one side of the wallet and place a strip of black duct tape over the side. Be sure only half of the strip is stuck to the wallet. It should look like the picture below.

Now, on the other side we must place a piece of duct tape with the sticky side facing down. Again, be sure only half of the tape is sticking to the side. Refer to the picture below for a visual reference.
Now, we must fold the wallet so both sides with sticky tape are near each other. Both of our sides should now have tape with the sticky side facing up. On the side on top, we must fold the sticky side over so it is now facing downward. To make placement easier, we must fold the excess tape up, as shown in the picture below.

Now, we must stick them together. The picture below illustrates what our product should look like. Keep in mind, the wallet will and should not be completely flat. Remember, one side is longer than the other!

Now we must fold the remaining sticky side over the joint and trim the excess tape off. Once complete, the edge of our wallet should look like the picture below.

Now, we must seal the bottom of our wallet, so our money doesn't fall out. We must unroll a piece of duct tape, then divide it in half (with our razor knife), like a hotdog bun.
Like the picture below illustrates, we should have a piece of duct tape with half of the normal width. Now, place this over the bottom of the wallet. Be sure to fold it over from one face to the other. (The inside face to the outside face.) This signle piece should only cover half of the length of the wallet and be sure not to place any duct tape on the bottom of the folding section. Now repeat this process for the other half of the wallet.
After this section is complete, fold the wallet in half. (Like a taco) This will now be the official fold in our bi-fold wallet.

The skeleton of our wallet is now alive! But, here at WeeklyDT, we have to spice things up, and make our products look superior to everyone else's! That's WeeklyDT's competitive edge.

Let's continue by adding a pocket to our wallet! Unroll a small piece of duct tape. This will become the inside of our pocket so be sure it is as long as an I.D. card. (We must trim the edges to make the wallet look sharp and professional.)
As the picture below mandates, be sure this piece's sticky side is now facing upwards.

Now, unroll another piece which is slightly longer than the piece above. Place this piece, sticky side down, directly over our first piece. The shorter, first piece should not be visible now.

Now, due to the extensions of the sticky sections on the longer piece, our pocket is ready to be placed on the wallet. After placement, we must be sure to place a piece of tape to cover the bottom of our pocket so our I.D. doesn't fall out. The picture below illustrates this procedure.

Please feel free to make as many of these pockets as you wish! The more pockets the better!
Now it is time to focus on the outside of our wallet. We will begin by unrolling a long piece of white duct tape, and the regular gray/silver duct tape.
Once we have completed this task, using our razor knife, we must cut squares from our pieces of long white and gray tape. The picture below illustrates what the squares should look like. Be sure two squares = the total width of the duct tape strip. Remember a cube's length is equal to its width. Refer to the picture below to get a general idea of size. (Measuring produces a neater and sharper effect.)

Now we will start placing our cubes! We will be placing them like a checkerboard, with a slight, offset angle. (Refer to the final picture to observe this angle.) This part is the easiest part and final part of our lesson!

When we are finished with our placement stage, the wallet is complete! Be sure to trim off any excess tape where the cubes extend past the black wallets edges. The wallet should now look like the picture below!

We are finally finished! Now go show this bad boy off to all your friends! Be sure to stay close for our revolutionary future lessons! See you soon.


No comments:
Post a Comment