To begin this lesson, we must lay our hand flat on a piece of paper and trace around it with a pencil. Be sure the pencil is completely vertical, or the trace will become distorted. When we are finished, our product should look like the picture below.

Now, we must lay a duct tape foundation which is larger than the hand we have traced. Be sure to double check the dimensions by laying the paper over the tape and feeling around the edges. The finished product should look like the picture below.

Now, we must lay the paper with the trace of our hand over the duct tape foundation. Be sure to fix the paper into position with strips of scrap duct tape!
 Now, we just cut along the solid lines. This reminds me of kindergarten... Ahh the easy good ol days!
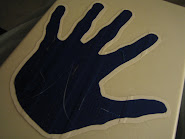
 Once we have are hand cut out, we must remove the excess tape, then gently remove the hand print. We must lay a large white base to place the hand over. (The base must be approximately one-fourth of an inch larger than the blue handprint.) We will now place the blue hand over the white base.
 Now, we must trim the white tape off. Be sure to leave approximately one forth of an inch of white tape left around the print as a border. (Borders make the projects look sharper and more professional.)
Once our border is cut, we will remove the excess white tape. Our finished project should look like the picture below.

Congratulations! Your first duct tape handprint! But don't stop there! Keep it up! I want to see your variations and results!


No comments:
Post a Comment